Contents
1. Access and Configure your gateway
1.1 Find the IP address of your gateway
1.1.2 Connect via Ethernet with DHCP IP from router
1.1.3 Connect via Wi-Fi with DHCP IP from the router
1.1.4 Connect via Ethernet with fall back IP
2.2 Use the WAN port to access the Internet
2.3 Access the Internet as a Wi-Fi Client
2.4 Access the Internet via Cellular
2.4.1 Inserting the SIM Card into your DLOS8N-EC25E
2.4.2 Inserting the SIM Card into your LG308N-EC25E
2.4.3 Inserting the SIM Card into your LPS8N-EC25E, LPS8V2-EC25E, LG01V2-EC25E
2.4.4 Configuring the gateway to use Cellular
2.5 Check the Internet connection
3. Configure as a LoRaWAN gateway using MyDevices
3.1 Add your gateway to my devices (First time MyDevices user)
6.1 My Gateway won’t connect to MyDevices
Setting up your LoRaWAN System
Using The Things Network v3
1. Access and Configure your gateway
All of our gateways are configured as Wi-Fi Access Points by default. You can access and configure your gateway after connecting to its Wi-Fi network, or connecting via its Ethernet port.
1.1 Find the IP address of your gateway
1.1.1 Connect via Wi-Fi
Upon the first booting of your gateway, it will auto generate a Wi-Fi network called dragino-xxxxxx with the password: dragino+dragino
You can use your laptop/PC to connect to this Wi-Fi network.
The PC will receive an IP address of 10.130.1.xxx and your gateway will have the default IP 10.130.1.1

1.1.2 Connect via Ethernet with DHCP IP from router
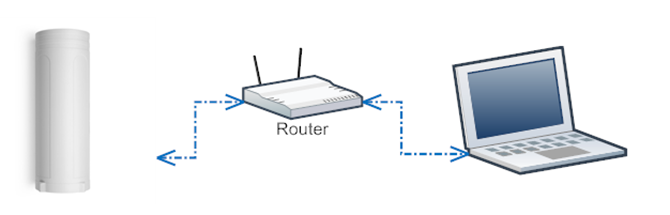
Alternatively, you can connect the gateways Ethernet port to your router and the gateway will obtain an IP address from your router. In the router’s management portal, you should be able to find what IP address the router has assigned to the gateway. You can also use this IP address to connect.
1.1.3 Connect via Wi-Fi with DHCP IP from the router
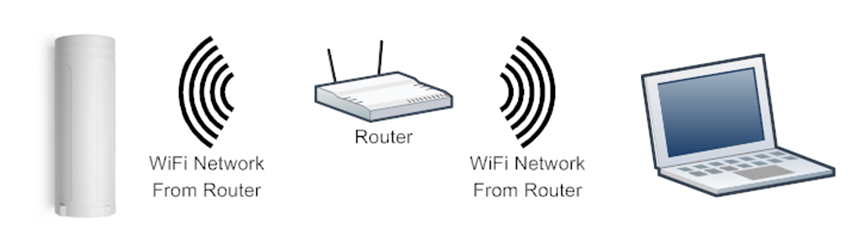
If the gateway is already connected to the router via Wi-Fi, you can use the Wi-Fi IP to connect to the gateway.
1.1.4 Connect via Ethernet with fall back IP
The WAN port also has a fall back IP address that is accessible if you can’t connect to the uplink router.
Click here for more information.
1.2 Access Configure Web UI
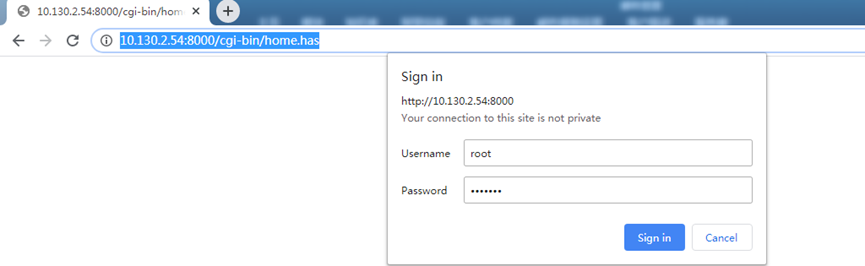
Open a browser on your PC and type the gateway IP address (this will differ depending on your connection method)
http://10.130.1.1/ (If accessing the device via Wi-Fi AP network)
or
http://IP_ADDRESS or http:// IP_ADDRESS:8000
You will see the login interface of the gateway as shown below.
The account details for the Web Login are:
User Name: root
Password: dragino
2. Typical Network Setup
2.1 Overview
Our gateways supports a flexible network set up for different environments. This section describes the typical network topology. The network set up includes:
- WAN Port Internet Mode
- Wi-Fi Client Mode
- Wi-Fi AP Mode
- Cellular Mode
2.2 Use the WAN port to access the Internet
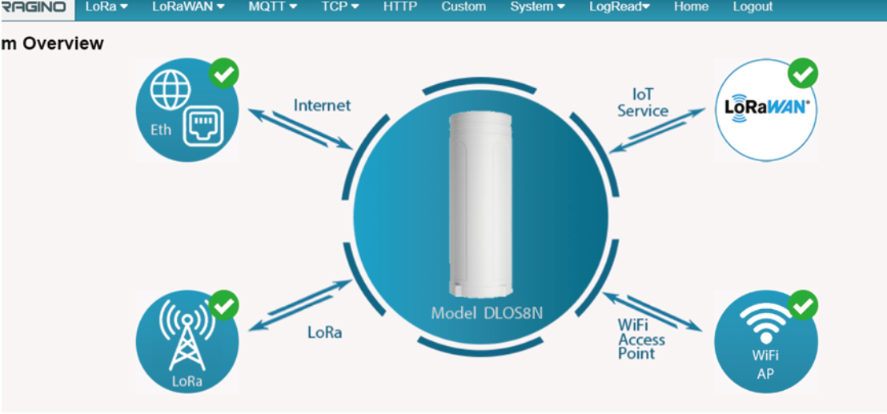
By default, our gateways are set to use the WAN port to connect to an upstream network. When you connect the gateway’s WAN port to an upstream router, the gateway will get an IP address from the router and gain Internet access via the upstream router. The network status can be checked in the home page:
2.3 Access the Internet as a Wi-Fi Client
In the Wi-Fi Client Mode, the gateway acts as a Wi-Fi client and gets DHCP from an upstream router via Wi-Fi.
The settings for the Wi-Fi Client is under the page System–> Wi-Fi –> Wi-Fi WAN Client Settings
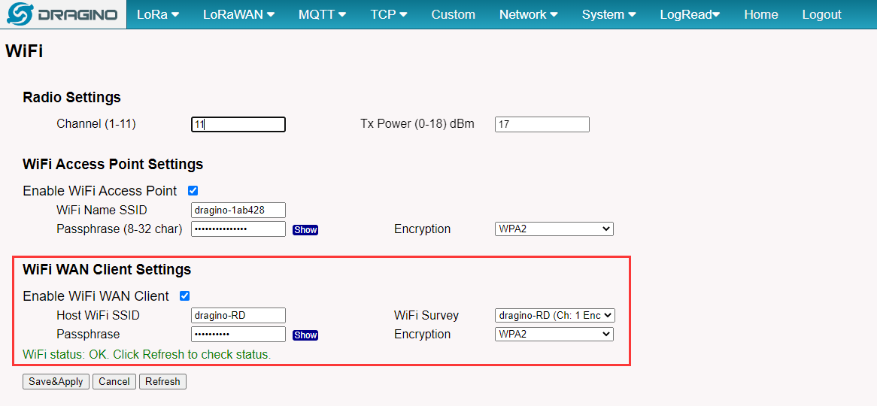
In the Wi-Fi Survey, choose your Wi-Fi AP, and input your Password. Then click Save & Apply to connect.
2.4 Access the Internet via Cellular
If your gateway supports 3G/4G Cellular modem options, the user can use this as the main internet connection or as a back up. Please see below on how to install the SIM card for all of our gateway models.
2.4.1 Inserting the SIM Card into your DLOS8N-EC25E
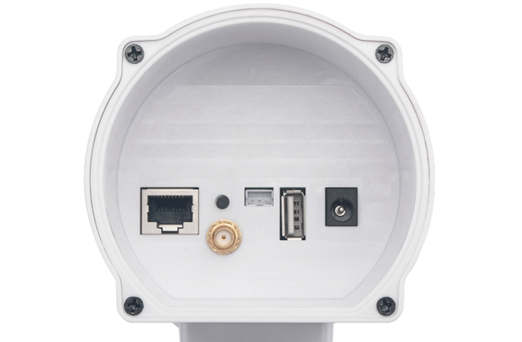
First, release the four screws of the DLOS8N, pull out the PCB and install the SIM card as shown below:

2.4.2 Inserting the SIM Card into your LG308N-EC25E
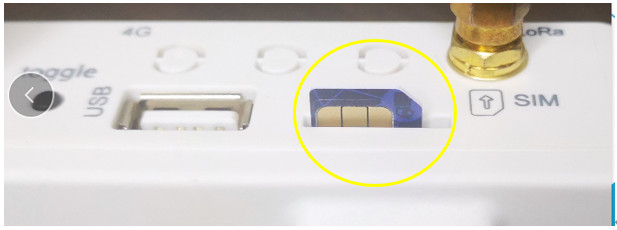
Whilst the device in turned off, insert the SIM card into the device as shown below:
2.4.3 Inserting the SIM Card into your LPS8N-EC25E, LPS8V2-EC25E, LG01V2-EC25E
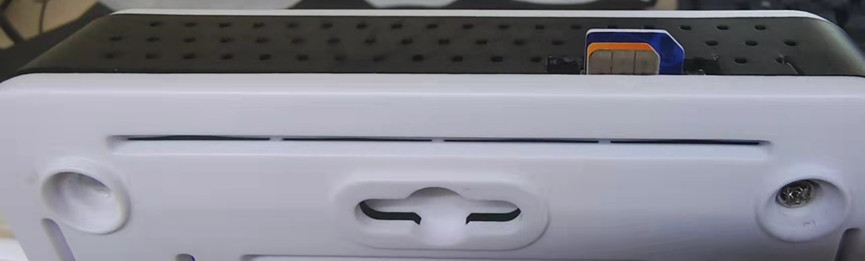
Whilst the device in turned off, insert the SIM card into the device as shown below:
2.4.4 Configuring the gateway to use Cellular
The set up page is System –> Cellular
While using the cellular as a backup WAN, the device will use 3G/4G for internet connection when the WAN port or Wi-Fi isn’t connecting. The device will reconnect to the WAN port or Wi-Fi after they have been reconnected.
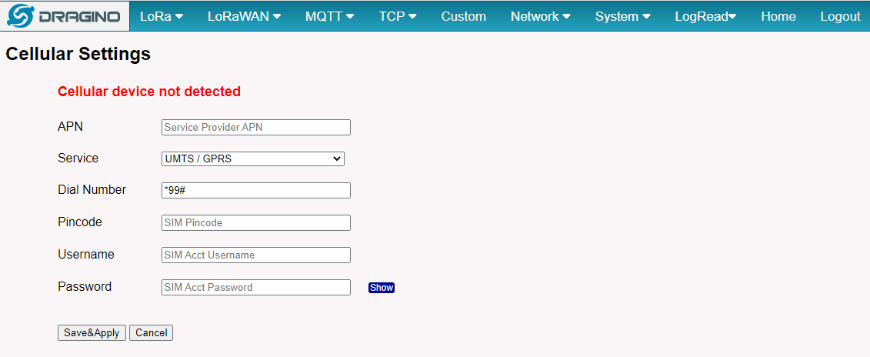
Note *: For the non-cellular gateways, this page will show “Cellular device not detected”.
2.5 Check the Internet connection
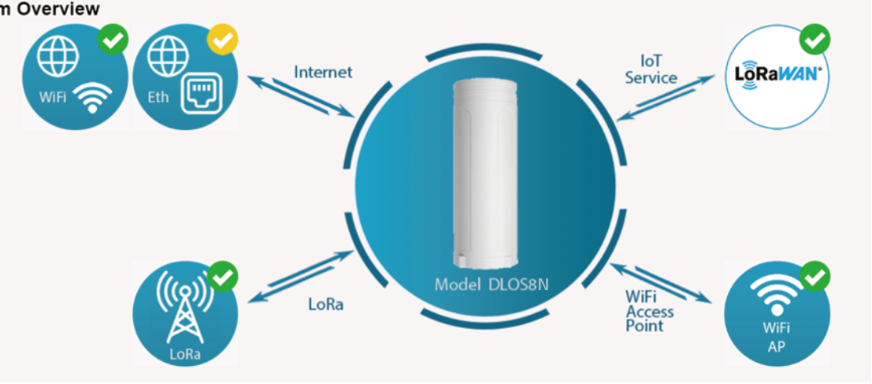
On the home page, we can check the Internet connection.
- GREEN Tick : This interface has Internet connection.
- Yellow Tick : This interface has an IP address but isn’t using it for internet connection.
- RED Cross : This interface isn’t connected.
3. Configure as a LoRaWAN gateway using MyDevices
Our gateways are fully compatible with the LoRaWAN protocol. It uses the legacy Semtech Packet forwarder to forward the LoRaWAN packets to the server. The structure is as shown below:

This chapter describes how to use your gateway to work with MyDevices
3.1 Add your gateway to my devices (First time MyDevices user)
All of our gateways are preconfigured for use with the MyDevices platform.
Step 1
Every gateway has a unique gateway ID. The ID can be found on the LoRaWAN page:
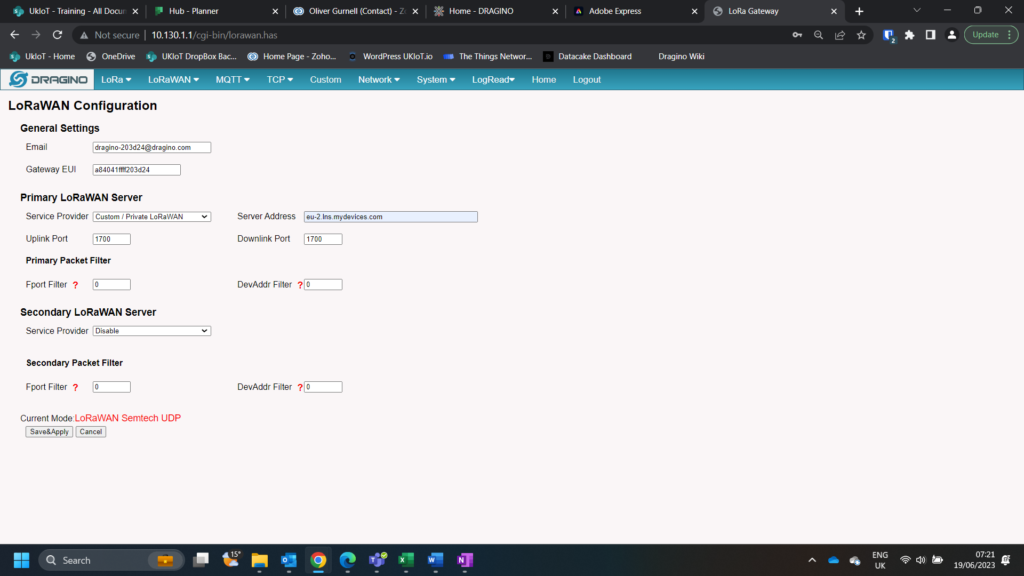
The example gateway ID here is: a840411e96744154
Step 2
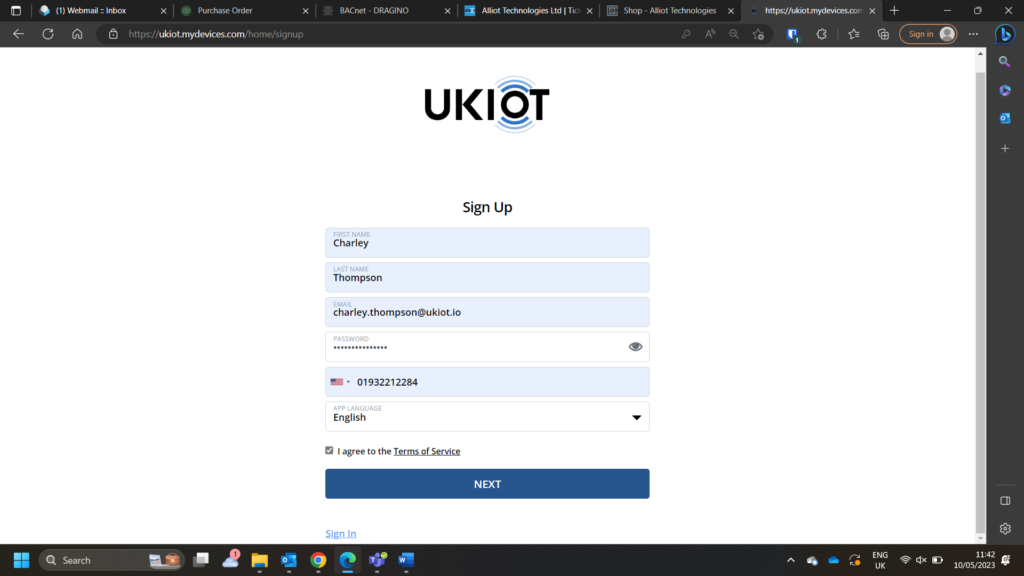
Then, create an account with UKIoT x MyDevices (Link Here).
Fill out your details, then click “Next”
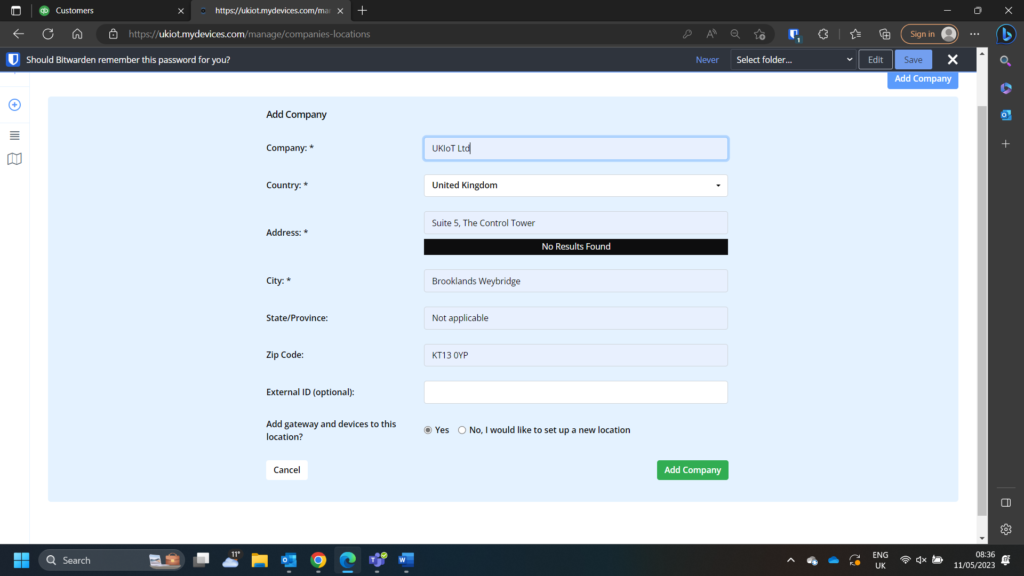
Then, enter your company details and click “Add Company”
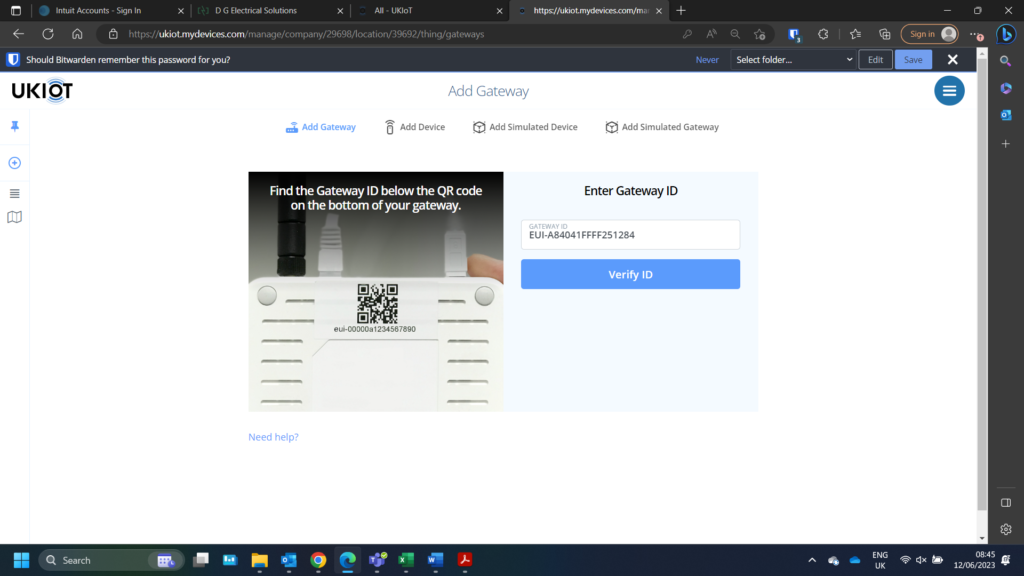
When prompted enter your gateway EUI in the following format: EUI-A84041FFFFXXXXXX (e.g. EUI-A84041FFFF251284). Click Verify ID.
If see the below error message, please check that you have entered the EUI correctly. If the error persists, please contact us at support@ukiot.io
Please enter a valid Gateway ID.
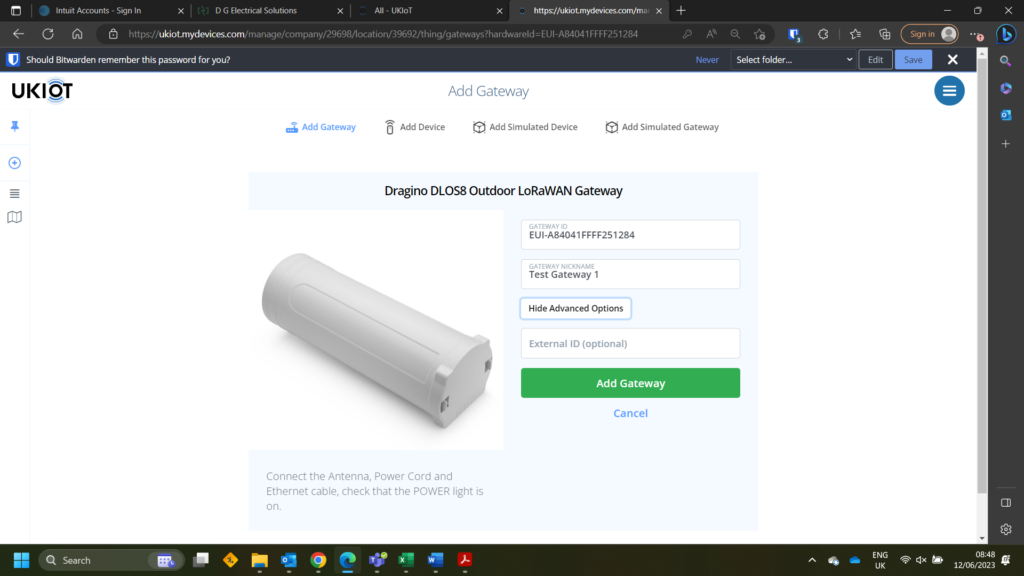
You will then be asked to name your gateway before you add it to your console. You can also give the gateway an optional External ID. Click “Add Gateway”.
In the home page, we can see the LoRaWAN connection is ready now.

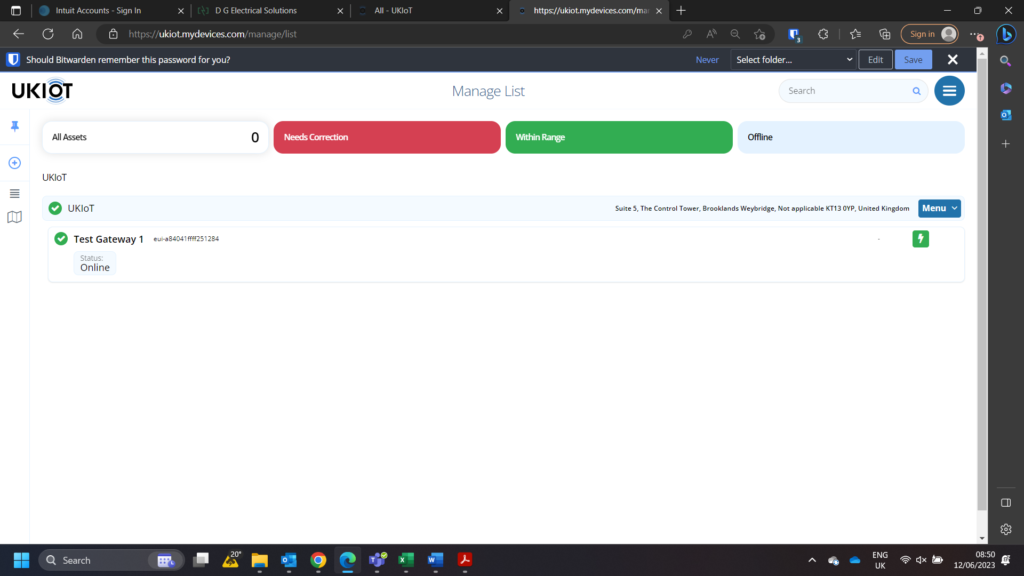
In the MyDevices portal, we can also see the gateway is connected.
3.2 Add your gateway to my devices (Existing MyDevices user)
All of our gateways are preconfigured for use with the MyDevices platform.
Step 1
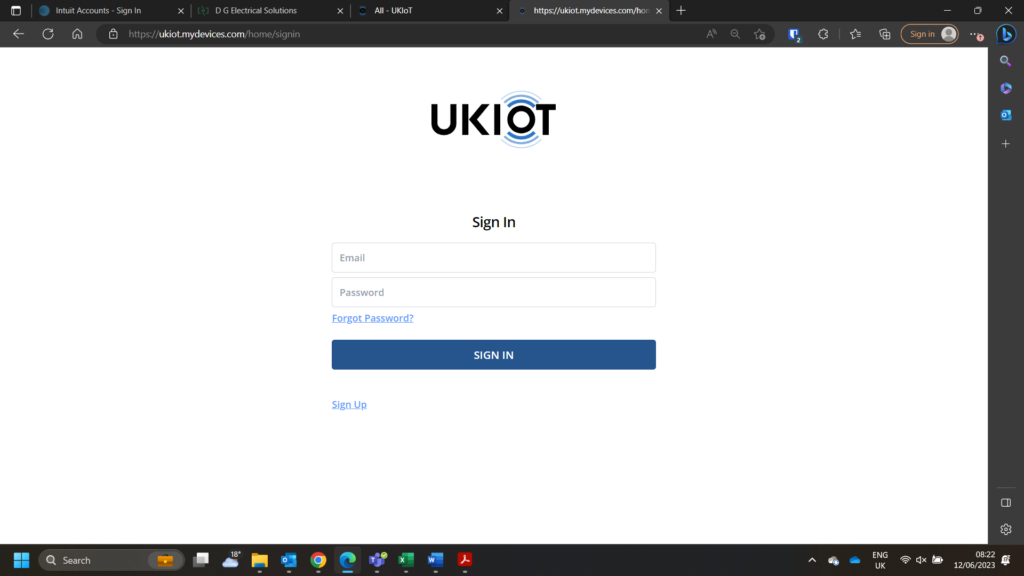
Log in to your MyDevices account (Link Here).
Step 2
On your console homepage, click the menu button to the right hand side of your location and select “+ Add Gateway” from the drop down list.
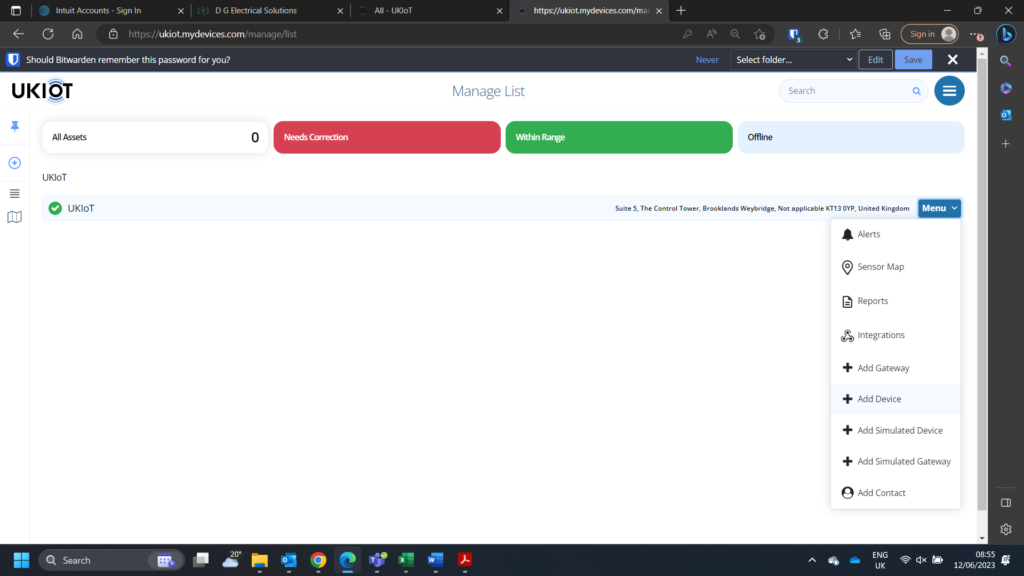
When prompted enter your gateway EUI in the following format: EUI-A84041FFFFXXXXXX (e.g. EUI-A84041FFFF251284). Click Verify ID.
If see the below error message, please check that you have entered the EUI correctly. If the error persists, please contact us at support@ukiot.io
Please enter a valid Gateway ID.
You will then be asked to name your gateway before you add it to your console. You can also give the gateway an optional External ID. Click “Add Gateway”.
In the home page, we can see the LoRaWAN connection is ready now.
In the MyDevices portal, we can also see the gateway is connected.
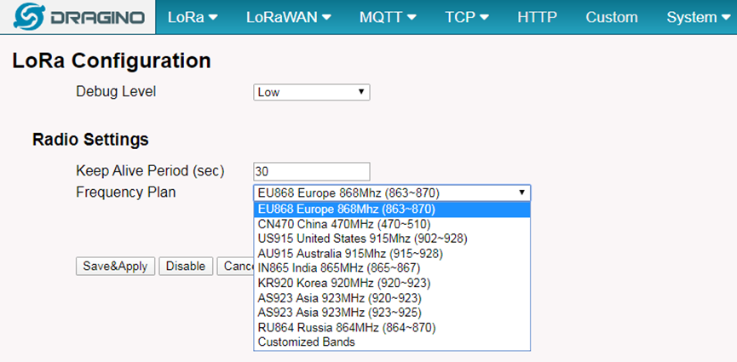
3.3 Configure frequency
Our gateways are also pre-configured to use the EU868 Frequency. If you need to change the frequency you will need to set the frequency plan in the gateway settings to match the end node you will be using to receive the LoRaWAN packets from the LoRaWAN sensor.
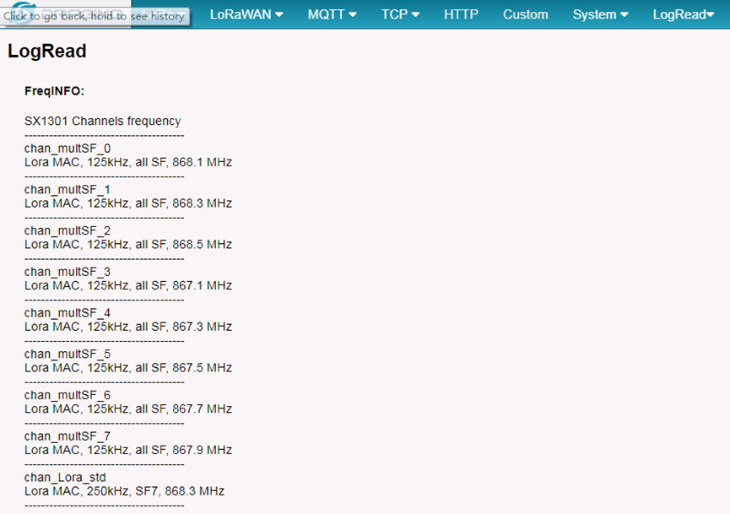
In the logread page, you can check the frequency band currently in use.
4.0 Add a LoRaWAN End Device
This section shows how to add a LoRaWAN End device to a LoRaWAN network and see the data in your MyDevices dashboard.
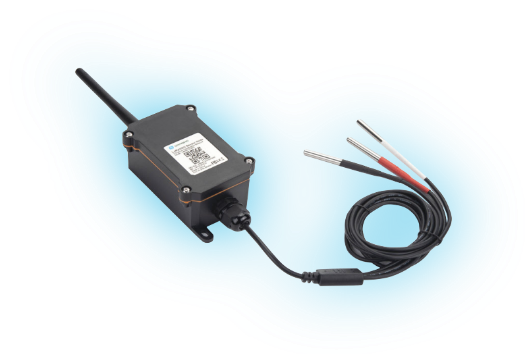
We will use the LSN50 V2-D23 as a reference device – the setup for other LoRaWAN devices will be similar.
Step 1
Log in to your MyDevices account (Link Here).
Step 2
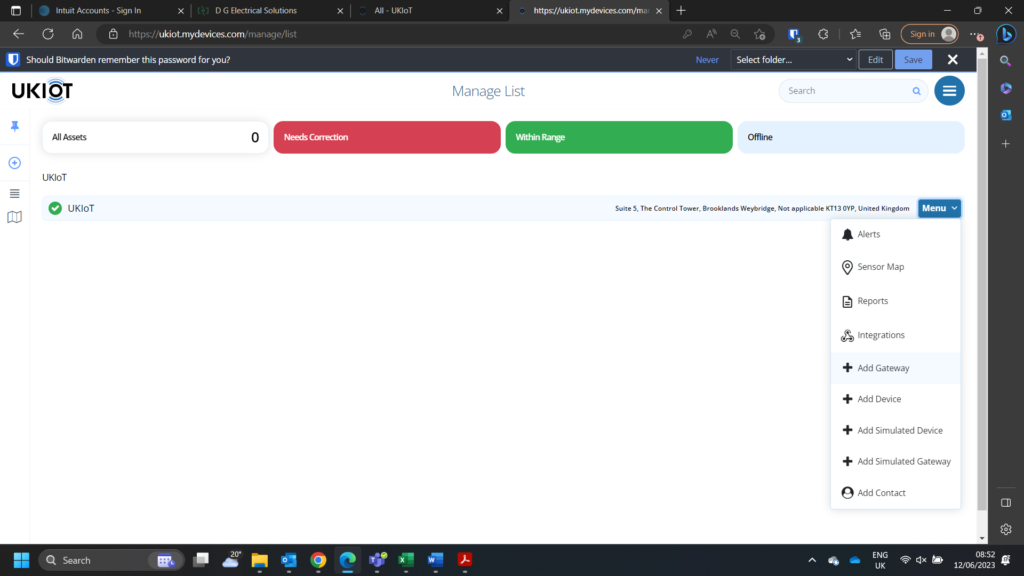
On your console homepage, click the menu button to the right hand side of your location and select “+ Add Device” from the drop down list.
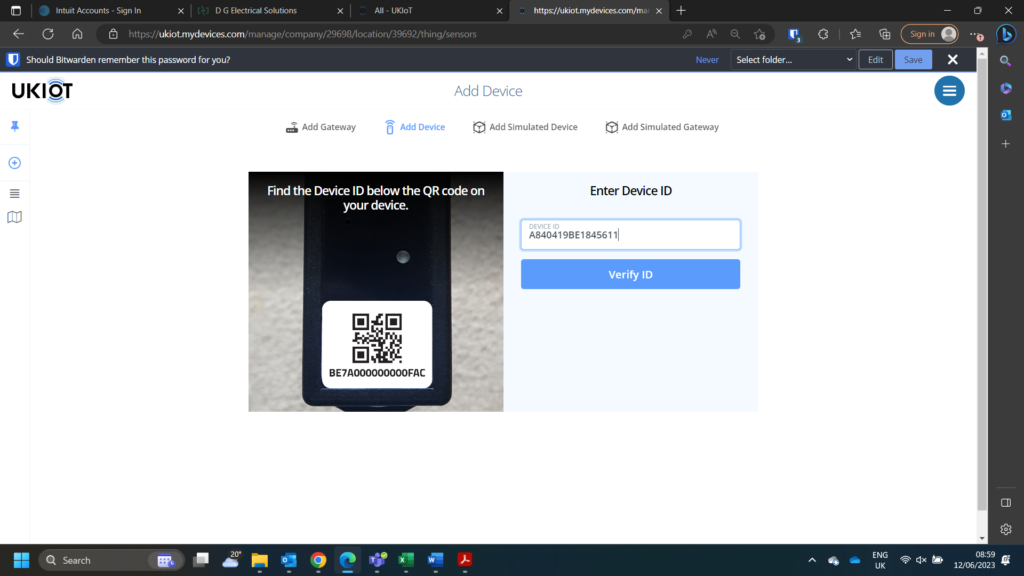
When prompted enter your device EUI. You can either type this is or scan the QR code on your device. Click Verify ID.
If see the below error message, please check that you have entered the EUI correctly. If the error persists, please contact us at support@ukiot.io
Please enter a valid Device ID.
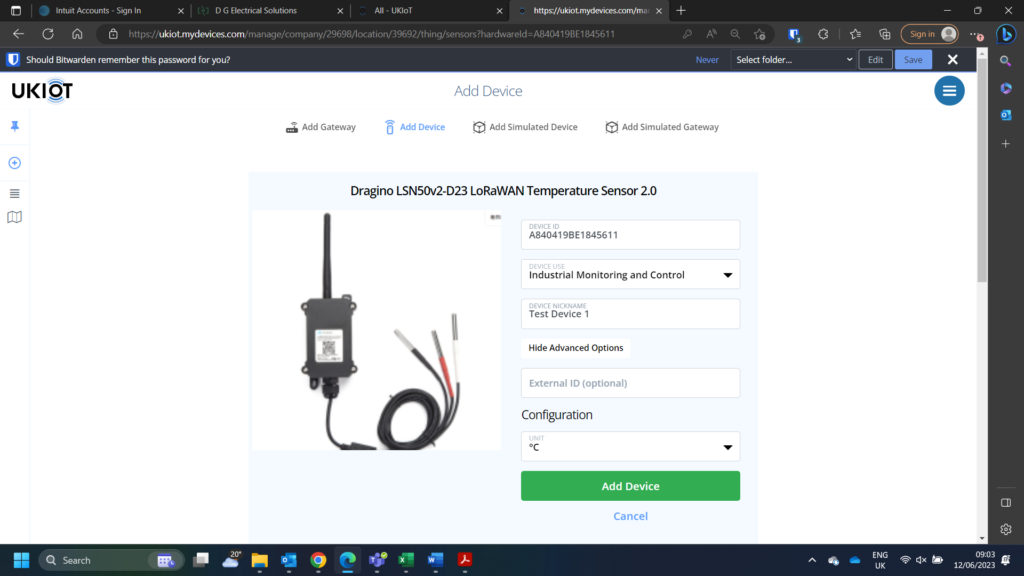
You will then be asked to name your device and select its use case before you add it to your console. You can also give the device an optional External ID.
You can also configure the device before clicking “Add Device”.
The device will then connect to MyDevices on it’s next uplink. You will then be able to see the data as shown below:
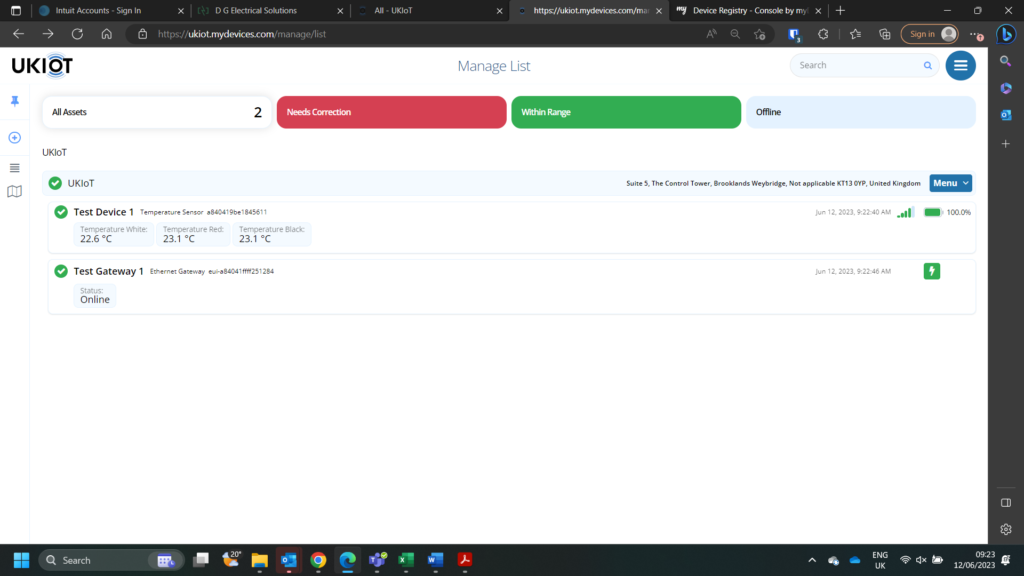
Please note that this may take a while- if it takes longer than 24hours for you device to connect, please contact us at support@ukiot.io.
6.0 Troubleshooting
6.1 My Gateway won’t connect to MyDevices
First check that the device has an internet connection. If not, you will need to configure the device to use either Ethernet, Wi-Fi or cellular as an internet connection method. Please see section 2 for details.
If the gateway still won’t connect, double check that you have entered the gateway EUI correctly when adding the gateway to MyDevices. If not, then you will need to delete the gateway and re-add it to MyDevices.
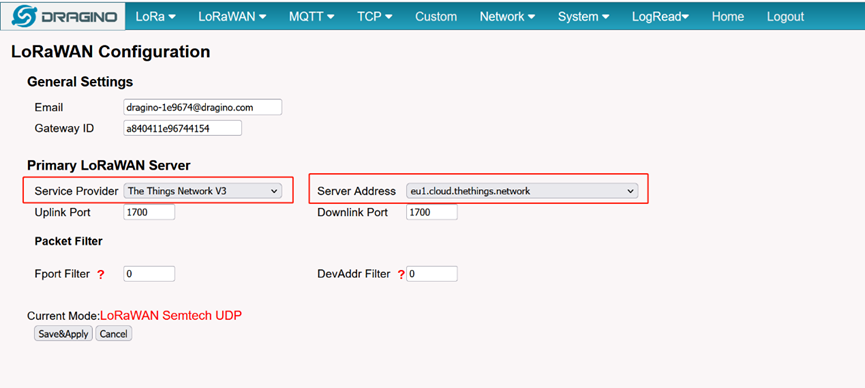
If the details have been entered correctly, check that the gateway has been pointed towards MyDevices. You can configure this by following the steps below:
6.1.1 Configure your gateway to connect to MyDevices
Make sure your gateway has a working Internet Connection first.
Change the following settings to:
Service provider:
Server Address:
Then click Save & Apply
In the home page, we can see the LoRaWAN connection is ready now.
In the MyDevices dashboard, we can also see the gateway is connected.
6.2 I can’t see my device data in MyDevices
First check that your device has been turned on by opening the device and placing the yellow jumper over the two power pins.
If the device is powered correctly, double check that you have entered the device ID (DEV EUI) correctly when adding the device to your MyDevices dashboard. If not, you will need to delete the device and re-add it.
7.0 Support
- – Try to see if your questions have already been answered in the wiki.
- – Support is provided Monday to Friday, from 07:00 to 17:00 GMT. Due to different time zones we cannot offer live support. However, your questions will be answered as soon as possible in the before mentioned schedule.
- – Provide as much information as possible regarding your enquiry (product models, accurately describe your problem and steps to replicate it etc) and send an email to: support@ukiot.io
Document Version: 1.0
| Version | Description | Date |
| 1.0 | Release | 2023-May-09 |